24 Mart 2020 Salı

HOW TO HACK ORACLE DATA REDACTION?

Data Redaction is a feature which protects the sensitive data on the fly in SQL query results from applications or users. So, unauthorized users can not see the original data.

However, there are some limitations which we need to be aware of before using Data Redacton:

Let's see the scenario:

I have a table EMPLOYEES_TEST and it has SSN column which has very sensitive data:


I'm creating a policy which will redact the sensitive column for HR user:

BEGIN
  DBMS_REDACT.add_policy
       (object_schema       => 'HR',
        object_name         => 'EMPLOYEES_TEST',
        column_name         => 'SSN',
        policy_name         => 'SSN_REDACT',
        function_type       => DBMS_REDACT.partial,
        function_parameters => 'FVVVVF,*VVVV*,*,1,1',
        expression          => 'SYS_CONTEXT(''USERENV'',''SESSION_USER'') = ''HR''');
end;

Test the policy:


It looks like policy is working. We couldnt see the whole data of SSN column.

Unfortunately, HR user is very curious to see the SSN of employees and wanted to try the following PL SQL block:

DECLARE
  SSN varchar2(1000);
BEGIN
  FOR rec IN 1 .. 999999 LOOP
    BEGIN
      SELECT FIRST_NAME || ' ' || LAST_NAME || '''s SSN is ' || rec
        into SSN
        FROM HR.EMPLOYEES_TEST
       WHERE SSN = to_char(rec);

      DBMS_OUTPUT.PUT_LINE(SSN);

    EXCEPTION
      WHEN NO_DATA_FOUND THEN
        CONTINUE;
    END;
  END LOOP;
END;
And he gets the output as:

Steven King's          SSN is   123456
Neena Kochhar's        SSN is   234567
Lex De Haan's          SSN is   345608
Alexander Hunold's     SSN is   456789
Bruce Ernst's          SSN is   563890
David Austin's         SSN is   668901
Valli Pataballa's      SSN is   789012
Diana Lorentz's        SSN is   890523
Nancy Greenberg's      SSN is   901234 

What is the limitation?

If you use the redacted column in "where" clause as a filter with original data, the data is validated and  not getting redacted.

So, we should be careful while using Data Redaction and understand its capabilities.


14 Mart 2020 Cumartesi

Pre-upgrade Patches for Oracle 19c Upgrade


Hi,

If you are planning to upgrade your GI or RDBMS versions to 19c, you must consider applying the following patches before starting the upgrade operation.


17 Ocak 2020 Cuma

Oracle Virtual Private Database

ORACLE VIRTUAL PRIVATE DATABASE


This is my scenario:

There are 3 managers and they have access to "HR.MYEMPLOYEES" table to see the details of employees which are working for their own department but we dont want them to see other departments' employees.

Create users for managers and give the required privileges:

create user Neena identified by Neena;
grant connect to Neena;
grant select on hr.myemployees to Neena;

create user Alexander identified by Alexander;
grant connect to Alexander;
grant select on hr.myemployees to Alexander;

create user Nancy identified by Nancy;
grant connect to Nancy;
grant select on hr.myemployees to Nancy;

Check "HR.MYEMPLOYEES" table:
select * from hr.myemployees;


Neena's employee_id........=101
Alexander's employee_id....=103
Nancy's employee_id........=108


We need the function which we'll use it for VPD policy:
CREATE OR REPLACE FUNCTION man_policy_func(user_name IN VARCHAR2,
                                      tab_name  in varchar2)
  RETURN varchar2 IS
  granted_manager NUMBER;
BEGIN
  CASE SYS_CONTEXT('USERENV', 'SESSION_USER')
    WHEN 'NEENA' THEN
      granted_manager := 101;
    WHEN 'ALEXANDER' THEN
      granted_manager := 103;
    WHEN 'NANCY' THEN
      granted_manager := 108;
    ELSE
      granted_manager := 0;
  END CASE;

  RETURN 'manager_id=' || granted_manager;

END;

With this function, Oracle will add the following clause on each query for our table:

where manager_id = &granted_manager;

Now, let's create the VPD policy:

BEGIN
      SYS.DBMS_RLS.ADD_POLICY(
        object_schema   => 'hr',
        object_name     => 'myemployees',
        policy_name     => 'manager_policy_vpd',
        function_schema => 'SYS',
        policy_function => 'man_policy_func',
        statement_types => 'select'
     );
  END;

Check if our VPD policy is working:


  • As you see, Neena could only see the employees whose manager_id is 101


  • Like Neena, Alexander can see only his employees.


2 Ocak 2020 Perşembe

Oracle Transparent Sensitive Data Protection

The aim of this post is creating a sensitive type, associate it to columns and combine it to "Oracle Sensitive Data Protection".

In our scenario, there is an application user called "APPUSER" and it has privileges to select and see the original data but we dont want any other users (even the owner of table) will see the sensitive data of the related tables.

Our sensitive column is TCKN and its datatype is "varchar2"

Create tables with sensitive column:
CREATE TABLE HR.employees (first_name varchar2(20), 
                           last_name varchar2(20), 
                           telephone_num varchar2(20), 
                           TCKN varchar2(11));

CREATE TABLE HR.accounts (TCKN varchar2(11), 
                          branch_id number(5), 
                          deposit number(10));

Insert data:
insert into HR.employees values ('Emre','Ozturk','222-333-444','11223344550');
insert into HR.employees values ('Ahmet','Yilmaz','444-555-666','22334455660');
insert into HR.employees values ('Okan','Demirel','666-777-888','33445566770');
insert into HR.employees values ('Alper','Akin','000-111-222','44556677880');
commit;

insert into HR.accounts values ('11223344550',120,2450);
insert into HR.accounts values ('22334455660',156,2450);
insert into HR.accounts values ('33445566770',134,2450);
insert into HR.accounts values ('44556677880',197,2450);
commit;

Create our sensitive type:
BEGIN
  DBMS_TSDP_MANAGE.ADD_SENSITIVE_TYPE(sensitive_type => 'TYPE_FOR_TCKN',
                                      user_comment   => 'Type for Identitiy Number columns using a varchar data type');
END;

We can check the created type:
select * from DBA_SENSITIVE_COLUMN_TYPES ;

Add our 1st sensitive column to associate the sensitive type:
BEGIN
  DBMS_TSDP_MANAGE.ADD_SENSITIVE_COLUMN(schema_name    => 'HR',
                                        table_name     => 'EMPLOYEES',
                                        column_name    => 'TCKN',
                                        sensitive_type => 'TYPE_FOR_TCKN',
                                        user_comment   => 'Associate EMPLOYEES table for sensitive column');
END;

Create the Transparent Sensitive Data Protection Policy:

For this policy, we will redact the TCKN column of first and last 3 digits. Only "appuser" will see the original data:
DECLARE
  redact_feature_options DBMS_TSDP_PROTECT.FEATURE_OPTIONS;
  policy_conditions      DBMS_TSDP_PROTECT.POLICY_CONDITIONS;
BEGIN
  redact_feature_options('expression') := 'SYS_CONTEXT(''USERENV'',''SESSION_USER'') !=''APPUSER''';
  redact_feature_options('function_type') := 'DBMS_REDACT.PARTIAL';
  redact_feature_options('function_parameters') := 'FFVVVVVVFFF,**VVVVVV***,*,1,1';
  policy_conditions(DBMS_TSDP_PROTECT.DATATYPE) := 'VARCHAR2';
  DBMS_TSDP_PROTECT.ADD_POLICY('PARTIAL_TCKN_POL',
                               DBMS_TSDP_PROTECT.REDACT,
                               redact_feature_options,
                               policy_conditions);
END;

Associate the Policy with a Sensitive Type:
BEGIN
     DBMS_TSDP_PROTECT.ASSOCIATE_POLICY(
     policy_name        => 'PARTIAL_TCKN_POL',
     sensitive_type     => 'TYPE_FOR_TCKN',
     associate          => TRUE);
END;

Enable Protection:
BEGIN
  DBMS_TSDP_PROTECT.ENABLE_PROTECTION_TYPE(sensitive_type => 'TYPE_FOR_TCKN');
END;

Select table with appuser:
SQL> conn appuser/ora123;
Connected.

SQL> select * from hr.employees;

FIRST_NAME           LAST_NAME            TELEPHONE_NUM        TCKN
-------------------- -------------------- -------------------- -----------
Emre                 Ozturk               222-333-444          11223344550
Ahmet                Yilmaz               444-555-666          22334455660
Okan                 Demirel              666-777-888          33445566770
Alper                Akin                 000-111-222          44556677880

Select table with HR:
SQL> conn hr/hr
Connected.
 
SQL> select * from hr.employees;

FIRST_NAME           LAST_NAME            TELEPHONE_NUM        TCKN
-------------------- -------------------- -------------------- -----------
Emre                 Ozturk               222-333-444          ***23344***
Ahmet                Yilmaz               444-555-666          ***34455***
Okan                 Demirel              666-777-888          ***45566***
Alper                Akin                 000-111-222          ***56677***


Now associate this sensitive type to TCKN column of another table:
BEGIN
  DBMS_TSDP_MANAGE.ADD_SENSITIVE_COLUMN(schema_name    => 'HR',
                                        table_name     => 'ACCOUNTS',
                                        column_name    => 'TCKN',
                                        sensitive_type => 'TYPE_FOR_TCKN',
                                        user_comment   => 'Sensitive column addition of TCKN_type');
END;

Disable and Enable the protection:
BEGIN
  DBMS_TSDP_PROTECT.DISABLE_PROTECTION_TYPE(sensitive_type => 'TYPE_FOR_TCKN');
  DBMS_TSDP_PROTECT.ENABLE_PROTECTION_TYPE(sensitive_type => 'TYPE_FOR_TCKN');
END;

Now query the table with HR:
SQL> conn appuser/ora123
Connected.

SQL> select * from hr.accounts

TCKN         BRANCH_ID    DEPOSIT
----------- ---------- ----------
11223344550        120       2450
22334455660        156       3650
33445566770        134       1480
44556677880        197       8690

SQL> conn hr/hr
Connected.

SQL> select * from hr.accounts

TCKN         BRANCH_ID    DEPOSIT
----------- ---------- ----------
***23344***        120       2450
***34455***        156       3650
***45566***        134       1480
***56677***        197       8690

5 Aralık 2019 Perşembe

Oracle Database 12.2 New Feature => Re-order Table Online and Its Effect on Index Performance


With 12cR2, we can re-order our tables online according to any column.

Create and Fill table:
 

Order By empid:


Order By empname:


Performance Effect:

Reordering table can improve the performance of index access because if the table is ordered according to index column, we need to visit less leaf blocks and it will reduce the logical I/O.

Dummy Table:

Create a dummy table with 1.000.000 rows:

Create index on empid:

9 Ekim 2019 Çarşamba

RMAN => What is the difference between Full Backup & Level 0 Backup?


Hi,

While I was checking someone's RMAN backup strategy, I saw a very wrong configuration. They are taking Full Backup (Not Level 0) every sunday and taking Level 1 backup at the rest of the days.

I asked; why do you use Full Backup instead of Level 0?

They answered "Because if we use Level 0 backup, we see 'Incr Backup' at the Enterprise Manager Backup Reports Screen":)

They think that Level 0 and Full Backup are identical.

Let's test and see if they are really same or not:

--> Create RMAN backups with 2 different method while database is mounted:

Full Backup

RMAN> backup as compressed backupset database format '/u01/app/oracle/backup/full_backup_%U.bck';

Level 0 Backup

backup as compressed backupset incremental level 0 database format '/u01/app/oracle/backup/level0_%U.bck';

Check the size of backups:


As you see, the size of the backups are identical.

-->I will delete all backups and take a "Full Backup" one more time:

RMAN> delete noprompt force backup;

RMAN> backup as compressed backupset database format '/u01/app/oracle/backup/full_backup_%U.bck';


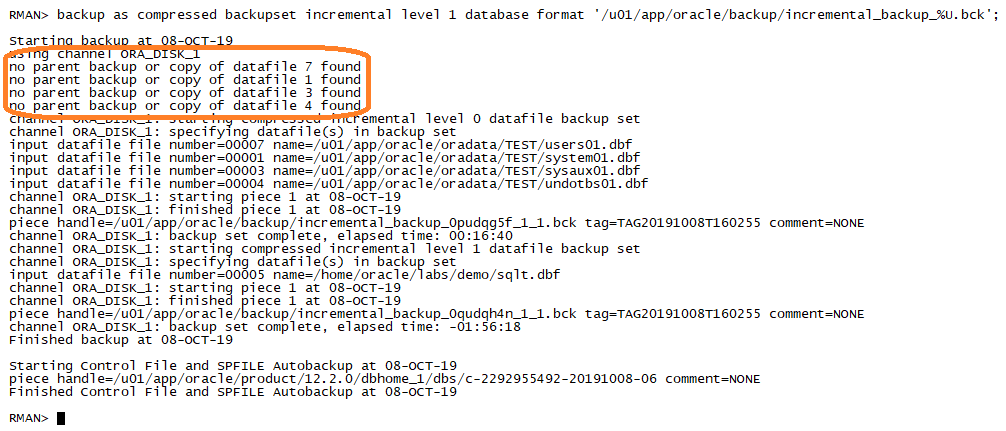
--> I will take a "Incremental Backup" and check the logs:


The RMAN log says "there is no parent backup or copy of datafile". So it means that the "Full Backup" which is previously taken before incremental backup is useless for "Incremental Backup Strategy"

Also, check the size of the incremental backup;


Total size of incremental backups and full backup are almost same. Therefore, we can understand that our Level 1 incremental backup is actually a Level 0 full backup.

Conclusion

Do not use "Full Backups" for your Incremental Backup strategy. Your incremental backups can be used only if you have Level 0 parent backups.


4 Ekim 2019 Cuma

How to Identify Hot Objects for "dbms_shared_pool.markhot" after Oracle Database 12cR2?


Hi,

With 12cR2, there are some modifications for X$KGLOB table.

The columns KGLOBT23 was replaced with "KGLOBLCT" and  KGLOBT24 was replaced with "KGLOBPCT".

So, you can use the following query to identify hot objects then you can mark them with dbms_shared_pool package.

select *
  from (Select case
                 when (kglhdadr = kglhdpar) then
                  'Parent'
                 else
                  'Child ' || kglobt09
               end cursor,
               kglhdadr ADDRESS,
               substr(kglnaobj, 1, 20) name,
               kglnahsh hash_value,
               kglobtyd type,
               KGLOBLCT LOCKED_TOTAL,
               KGLOBPCT PINNED_TOTAL,
               kglhdexc EXECUTIONS,
               kglhdnsp NAMESPACE
          from x$kglob
         order by KGLOBPCT desc)
 where rownum <= 20


10 Temmuz 2019 Çarşamba

Oracle Database 12c => Read Privilege

Do you think "SELECT" privilege is very innocent?

Maybe we should consider that one more time:

Creating a user and give priviliges which can select "hr.employees" table.
SQL> create user myuser identified by ora123;

User created.

SQL> grant connect, resource to myuser;

Grant succeeded.

SQL> grant select on hr.employees to myuser;

Grant succeeded.
Connect with new user and select employees table with "FOR UPDATE" option:
SQL> conn myuser
Enter password: 
Connected.

SQL> show user
USER is "MYUSER"

SQL> select * from hr.employees for update;
.
.
.
107 rows selected.

SQL> 
As you see I could lock whole table only with "SELECT" privilege.
It means if you give "SELECT" privilege for a table to a specific user, that user is able to lock against DML transactions from other sessions.

So, it means you should be very careful while giving "SELECT" privilege or you can user "READ" privilege with 12c.

Let's try "READ" privilege
SQL> create user myuser2 identified by ora123;   

User created.

SQL> grant connect, resource to myuser2;

Grant succeeded.

SQL> grant read on hr.employees to myuser2;

Grant succeeded.
Now, try to lock the table with "READ" privilege
SQL> conn myuser2;
Enter password: 

SQL> show user;
USER is "MYUSER2"

SQL> select * from hr.employees for update;

select * from hr.employees for update
                 *
ERROR at line 1:
ORA-01031: insufficient privileges

If you are using Oracle Database 12c, it is much more better to give "READ" privilege to your users if they only need to see table's data.


8 Temmuz 2019 Pazartesi

Oracle Database 12c => Online Statistics Gathering

With 12c and later, Oracle has introduced online statistics gathering for bulk operations like CTAS and and INSERT operation (with APPEND).

There is a new hidden parameter which controls this behaviour:

"_optimizer_gather_stats_on_load" 

By default, this parameter is true.

Effect On Direct Load Operations

When you create a table with CTAS, its statistics will be collected automatically.
SQL> explain plan for
  2  create table my_emp as select * from hr.employees;

Explained.

SQL> SELECT * FROM table (DBMS_XPLAN.DISPLAY('plan_table', null, 'basic'));

PLAN_TABLE_OUTPUT
--------------------------------------------------------------------------------
Plan hash value: 3521905591

------------------------------------------------------
| Id  | Operation                        | Name      |
------------------------------------------------------
|   0 | CREATE TABLE STATEMENT           |           |
|   1 |  LOAD AS SELECT                  | MY_EMP    |
|   2 |   OPTIMIZER STATISTICS GATHERING |           |
|   3 |    TABLE ACCESS FULL             | EMPLOYEES |
------------------------------------------------------

10 rows selected.
As you see in the explain plan, there is an extra step for statistics.

Lets create the table and check weather the table stats exist:
18:04:25 SQL> create table my_emp as select * from hr.employees;

Table created.

18:04:38 SQL> 
18:04:42 SQL> column table_name format a30
18:05:02 SQL> column last_analyzed format a30
18:05:10 SQL>
18:06:23 SQL> select table_name, last_analyzed
18:06:38   2  from user_tables
18:06:43   3  where table_name='MY_EMP';

TABLE_NAME                     LAST_ANALYZED
------------------------------ ------------------------------
MY_EMP                         27.06.2019 18:04:38

The "last_analyzed" time is exactly same with the creation time of the table.


Now, disable the online stats gathering on session level and create another table;
18:55:23 SQL> ALTER SESSION SET "_OPTIMIZER_GATHER_STATS_ON_LOAD"=FALSE;

Session altered.

18:55:54 SQL> 
18:55:57 SQL> create table my_emp2 as select * from employees;

Table created.

18:56:13 SQL> column table_name format a30
18:56:26 SQL> column last_analyzed format a30
18:56:31 SQL> 
18:56:32 SQL> select table_name, last_analyzed
18:56:39   2  from user_tables
18:56:44   3  where table_name='MY_EMP2';

TABLE_NAME                     LAST_ANALYZED
------------------------------ ------------------------------
MY_EMP2
There is no statistics for MY_EMP2 table.

It is also possible online stats gathering can impact your bulk load performance;

I have a filled table "TEST_DATA" which has 500.000 rows and empty tables TEST_DATA1 and TEST_DATA2 with same structure.

Online Statistics Gathering is Off;
SQL> alter system flush buffer_cache;

SQL> ALTER SESSION SET "_OPTIMIZER_GATHER_STATS_ON_LOAD"=FALSE;

Session altered.

Elapsed: 00:00:00.00
SQL> 
SQL> insert /*+ APPEND*/ into test_data1 select * from test_data;

5000000 rows created.

Elapsed: 00:00:08.72

SQL> select * from table(dbms_xplan.display_cursor);

SQL_ID  d10rkrsh5kqgg, child number 0
-------------------------------------
insert /*+ APPEND*/ into test_data1 select * from test_data

Plan hash value: 3839850929

---------------------------------------------------------------------------------
| Id  | Operation          | Name       | Rows  | Bytes | Cost (%CPU)| Time     |
---------------------------------------------------------------------------------
|   0 | INSERT STATEMENT   |            |       |       |  5256 (100)|          |
|   1 |  LOAD AS SELECT    | TEST_DATA1 |       |       |            |          |
|   2 |   TABLE ACCESS FULL| TEST_DATA  |  5679K|   157M|  5256   (1)| 00:00:01 |
---------------------------------------------------------------------------------

Note
-----
   - dynamic statistics used: dynamic sampling (level=2)

Online Statistics Gathering is On;
SQL> alter system flush buffer_cache;

SQL> ALTER SESSION SET "_OPTIMIZER_GATHER_STATS_ON_LOAD"=TRUE;

Session altered.

SQL> insert /*+ APPEND*/ into test_data2 select * from test_data;

5000000 rows created.

Elapsed: 00:00:13.27

SQL> select * from table(dbms_xplan.display_cursor);

SQL_ID  1n4c3095axqa0, child number 0
-------------------------------------
insert /*+ APPEND*/ into test_data2 select * from test_data

Plan hash value: 3839850929

-----------------------------------------------------------------------------------------------
| Id  | Operation                        | Name       | Rows  | Bytes | Cost (%CPU)| Time     |
-----------------------------------------------------------------------------------------------
|   0 | INSERT STATEMENT                 |            |       |       |  5256 (100)|          |
|   1 |  LOAD AS SELECT                  | TEST_DATA2 |       |       |            |          |
|   2 |   OPTIMIZER STATISTICS GATHERING |            |  5679K|   157M|  5256   (1)| 00:00:01 |
|   3 |    TABLE ACCESS FULL             | TEST_DATA  |  5679K|   157M|  5256   (1)| 00:00:01 |
-----------------------------------------------------------------------------------------------

Note
-----
   - dynamic statistics used: dynamic sampling (level=2)
It spent almost 5 seconds to gather statistics after insert operation.

So, we can say that if we have huge insert operation and if we want to speed it up, it would be good to disable online statistics and gather manually (maybe parallel) after insert finihed.


25 Haziran 2019 Salı

Oracle Database 19c New Feature => Propagate Restore Points from Primary to Standby site


With Oracle Database 19c, restore points which are created on primary database are automatically replicated on standby.

The restore points on standby are always normal restore points. It doesn't matter it is guaranteed or normal restore points on primary database.

There are 3 prerequisites for this feature:

1. The compatible parameter both on primary and standby database must be 19.0.0 or greater

2. The primary database must be open (not mounted) because of restored point replication is occured  through the redo logs. So, MRP process on standby needs to be running for replication.

3. There shouldn't be any existing restore point on standby database with same name.

Create a restore point on our 19c Primary database and see what is happening;


We created our restore point on primary. As you see there is a new column "REPLICATED" on "V$RESTORE_POINT" view and its value is "NO" on primary.


Let's check standby;


The name of the restore point on standby has suffix "PRIMARY" and "REPLICATED" column becomes "YES"


23 Mayıs 2019 Perşembe

"O7_DICTIONARY_ACCESSIBILITY" Security Parameter

The "O7_DICTIONARY_ACCESSIBILITY" setting is a database initializations parameter that allows/disallows with the EXECUTE ANY PROCEDURE and SELECT ANY TABLE access to objects in the SYS schema; this functionality was created for the ease of migration from Oracle 7 databases to later versions.

As leaving the SYS schema so open to connection could permit unauthorized access to critical data structures, this value should be set according to the needs of the organization.

Eventually, if this parameter is set to TRUE without your knowledge, your database may be at risk.

From Oracle Docs:

For example, if "O7_DICTIONARY_ACCESSIBILITY" is set to false, then the SELECT ANY TABLE privilege allows access to views or tables in any schema except the SYS schema (data dictionary tables cannot be accessed). The system privilege EXECUTE ANY PROCEDURE allows access on the procedures in any schema except the SYS schema.

If this parameter is set to false and you need to access objects in the SYS schema, then you must be granted explicit object privileges. The following roles, which can be granted to the database administrator, also allow access to dictionary objects:


  • SELECT_CATALOG_ROLE
  • EXECUTE_CATALOG_ROLE
  • DELETE_CATALOG_ROLE

20 Nisan 2019 Cumartesi

Using INDEX_FFS To Recover Table Which has Corrupted Blocks


In this article, I will try to demonstrate how to recover data from your corrupted table.
This method will not always gurantee to recover 100% of your table but the aim is to give the idea how to recover your data as much as possible in some favorable conditions.

Off course there are some other methods like salvaging the table according to ROWIDs which are not around the corrupted blocks but in this article I will use INDEX_FFS (Index Fast Full Scan) to retrieve the data.

What is FFS?  (from oracle docs)

An index fast full scan reads the index blocks in unsorted order, as they exist on disk.
This scan does not use the index to probe the table, but reads the index instead of the table,
essentially using the index itself as a table.

When the Optimizer Considers Index Fast Full Scans? (from oracle docs)

The optimizer considers this scan when a query only accesses attributes in the index.

To sum up, FFS will read the index to retrieve the data without accessing the table when the query asks only the columns which are exist on the index.


As I mentioned, this method will never gurantee to recover all data but I will write a scenario (tables, indexes etc.) to recover all my data.


Scenario:

Create Table;

create table hr.MY_EMP
(
  employee_id   NUMBER(6) not null,
  first_name    VARCHAR2(20),
  hire_date     DATE not null,
  department_id NUMBER(4)

);

Create Primary Key;

alter table hr.MY_EMP
  add constraint EMP_PK primary key (EMPLOYEE_ID) using index; 

Create indexes;

create index hr.myemp_indx1 on hr.my_emp (employee_id,hire_date,department_id);

create index hr.myemp_indx2 on hr.my_emp (employee_id,first_name);

Analyze Table

begin
  dbms_stats.gather_table_stats(ownname => 'HR',
                                tabname => 'MY_EMP',
                                cascade => TRUE);
end;

Load 100.000 random rows into my table

SQL> select * from hr.my_emp;


Check The Extents and Blocks

select file_id,block_id,blocks,extent_id 
   from dba_extents 
   where owner='HR' 
     and segment_name='MY_EMP' 
     and segment_type='TABLE'
   order by extent_id;


Corrupt some blocks manually

dd of=/u01/app/oracle/oradata/TEST/users02.dbf bs=8192 conv=notrunc seek=1649992 << EOF   
> corrupt block
> EOF
0+1 records in
0+1 records out
14 bytes (14 B) copied, 0.000294391 s, 47.6 kB/s

dd of=/u01/app/oracle/oradata/TEST/users02.dbf bs=8192 conv=notrunc seek=1650720 << EOF
> corrupt block
> EOF
0+1 records in
0+1 records out
14 bytes (14 B) copied, 0.00014643 s, 95.6 kB/s


Flush the buffer cache

alter system flush buffer_cache;

Now, try to select all rows and check sql plan


As you see above, I could select only 5400 rows until the first corrupted block if I want to select directly table


USING INDEX FAST FULL SCAN

Read the 1st index

*Sometimes CBO doesn't use FFS if you don't filter the query. To force the CBO to use the index, I'm adding a fake filter (e.employee!=-1) in the when condition


As you seee, I could select all 100000 rows without corruption. For now, I have full data of "employee_id", "hire_date" and "department_id" columns.


Read the 2nd index

*Using a fake index again (e.first_name!='XZYWQ')


As you see, I could read the 100000 rows for "first_name" column.

CREATE NEW TABLE

Now I can create a new table and load all data without corruption. My new table is on a new tablespace which doesnt have a corrupted datafile.

create table hr.MY_EMP_RECO
(
  employee_id   NUMBER(6),
  first_name    VARCHAR2(20),
  hire_date     DATE,
  department_id NUMBER(4)
)tablespace tbs_reco;

alter table hr.MY_EMP_RECO add constraint EMP_RECO_PK primary key (EMPLOYEE_ID) using index;


RECOVER DATA

First, load 100000 rows of employee_id, hire_date and department_id by using 1st index

Then, update the table to load first_name column.


Now, my table is ready. I retrieved all my data without accessing corrupted table blocks.